Vue3快速上手 vue2与vue3的区别,主要就是选项式api和组合式api
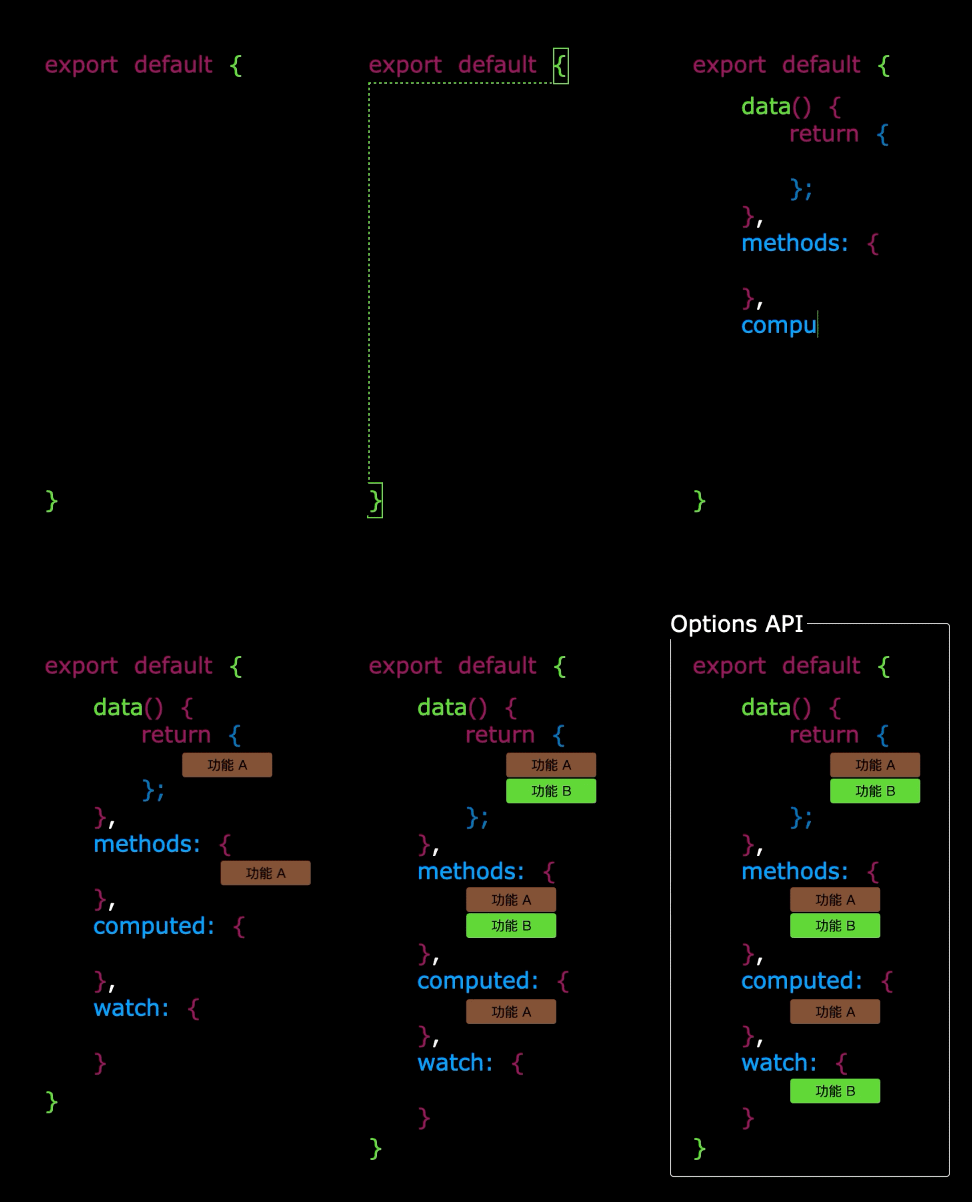
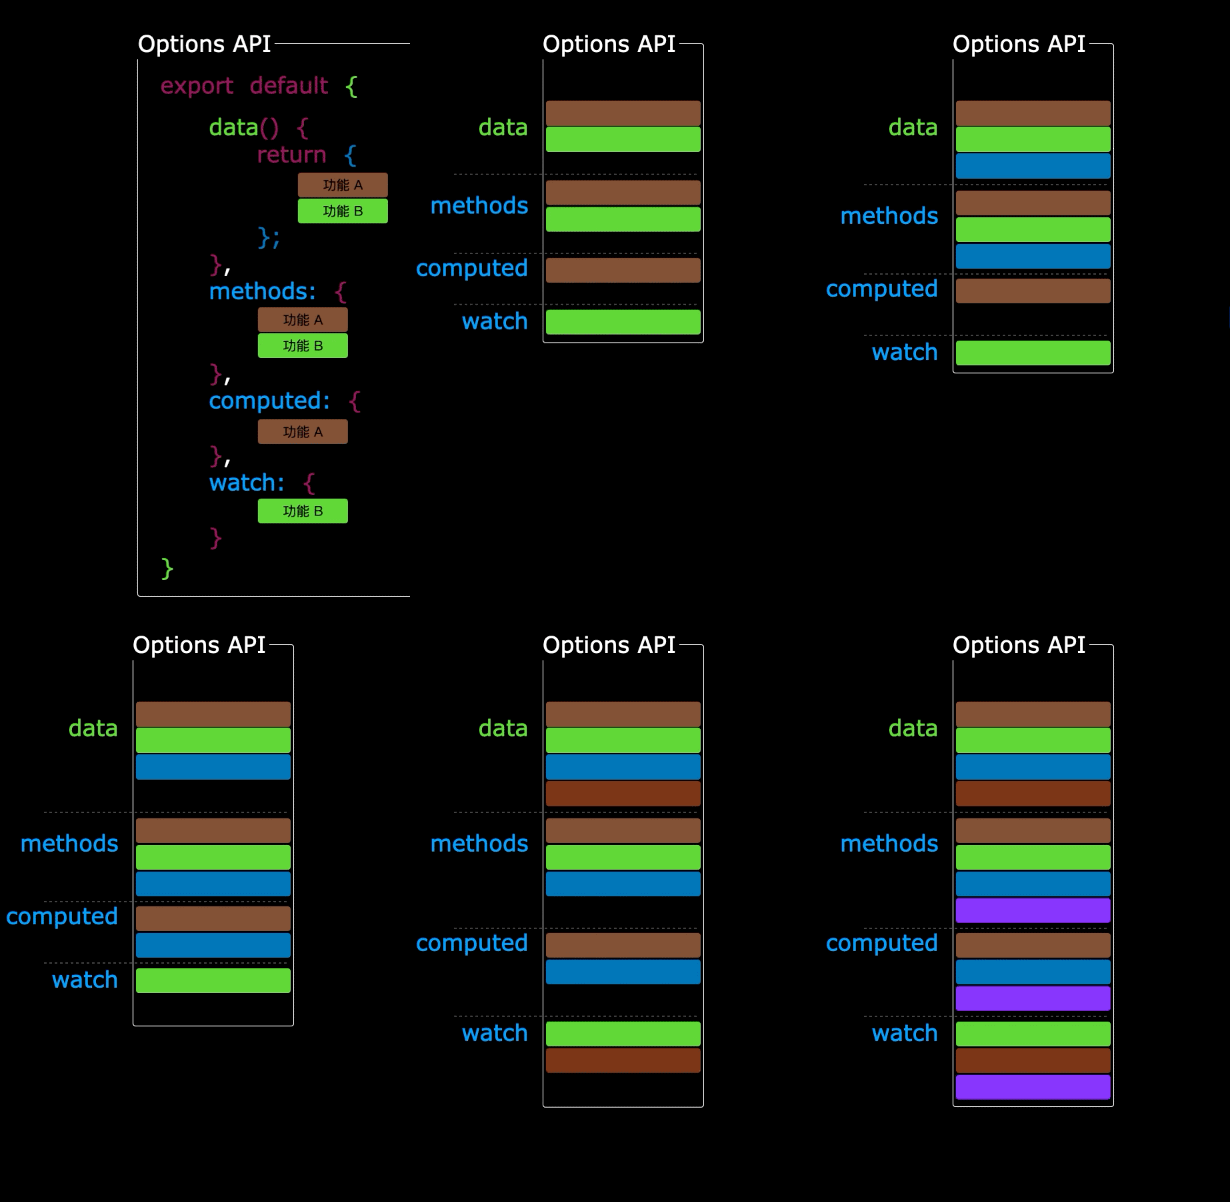
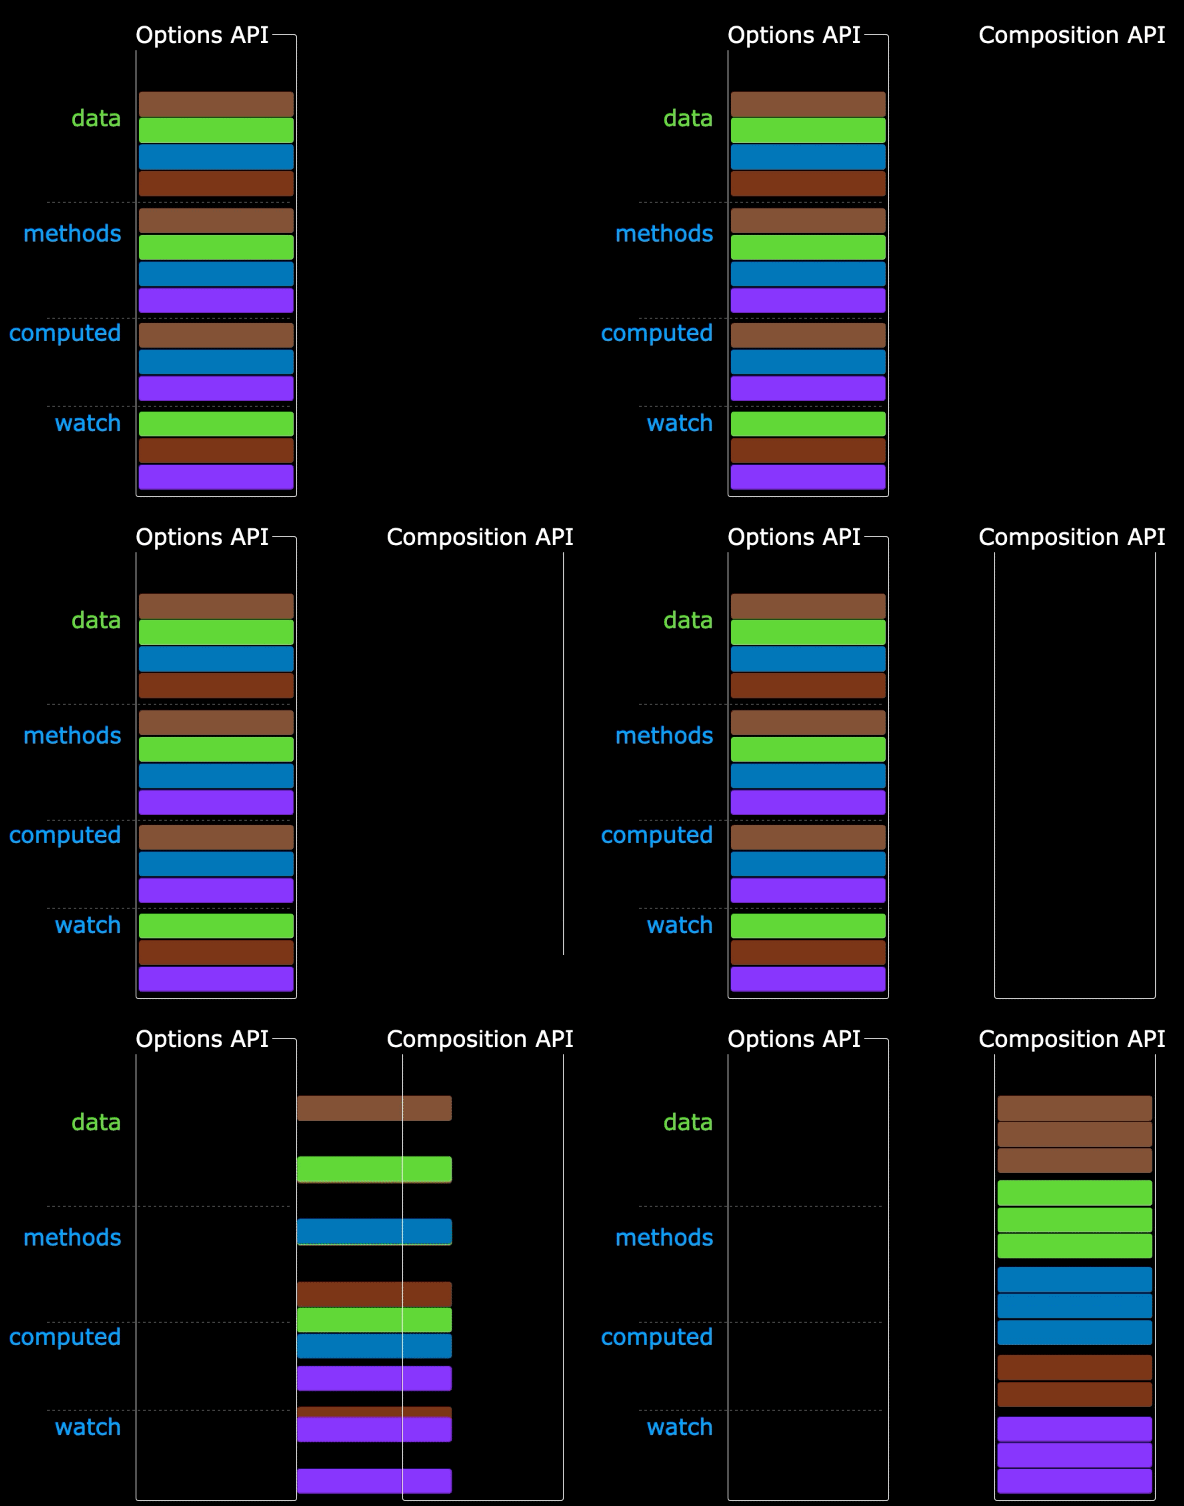
Options API 的弊端 Options类型的 API,数据、方法、计算属性等,是分散在:data、methods、computed中的,若想新增或者修改一个需求,就需要分别修改:data、methods、computed,不便于维护和复用。
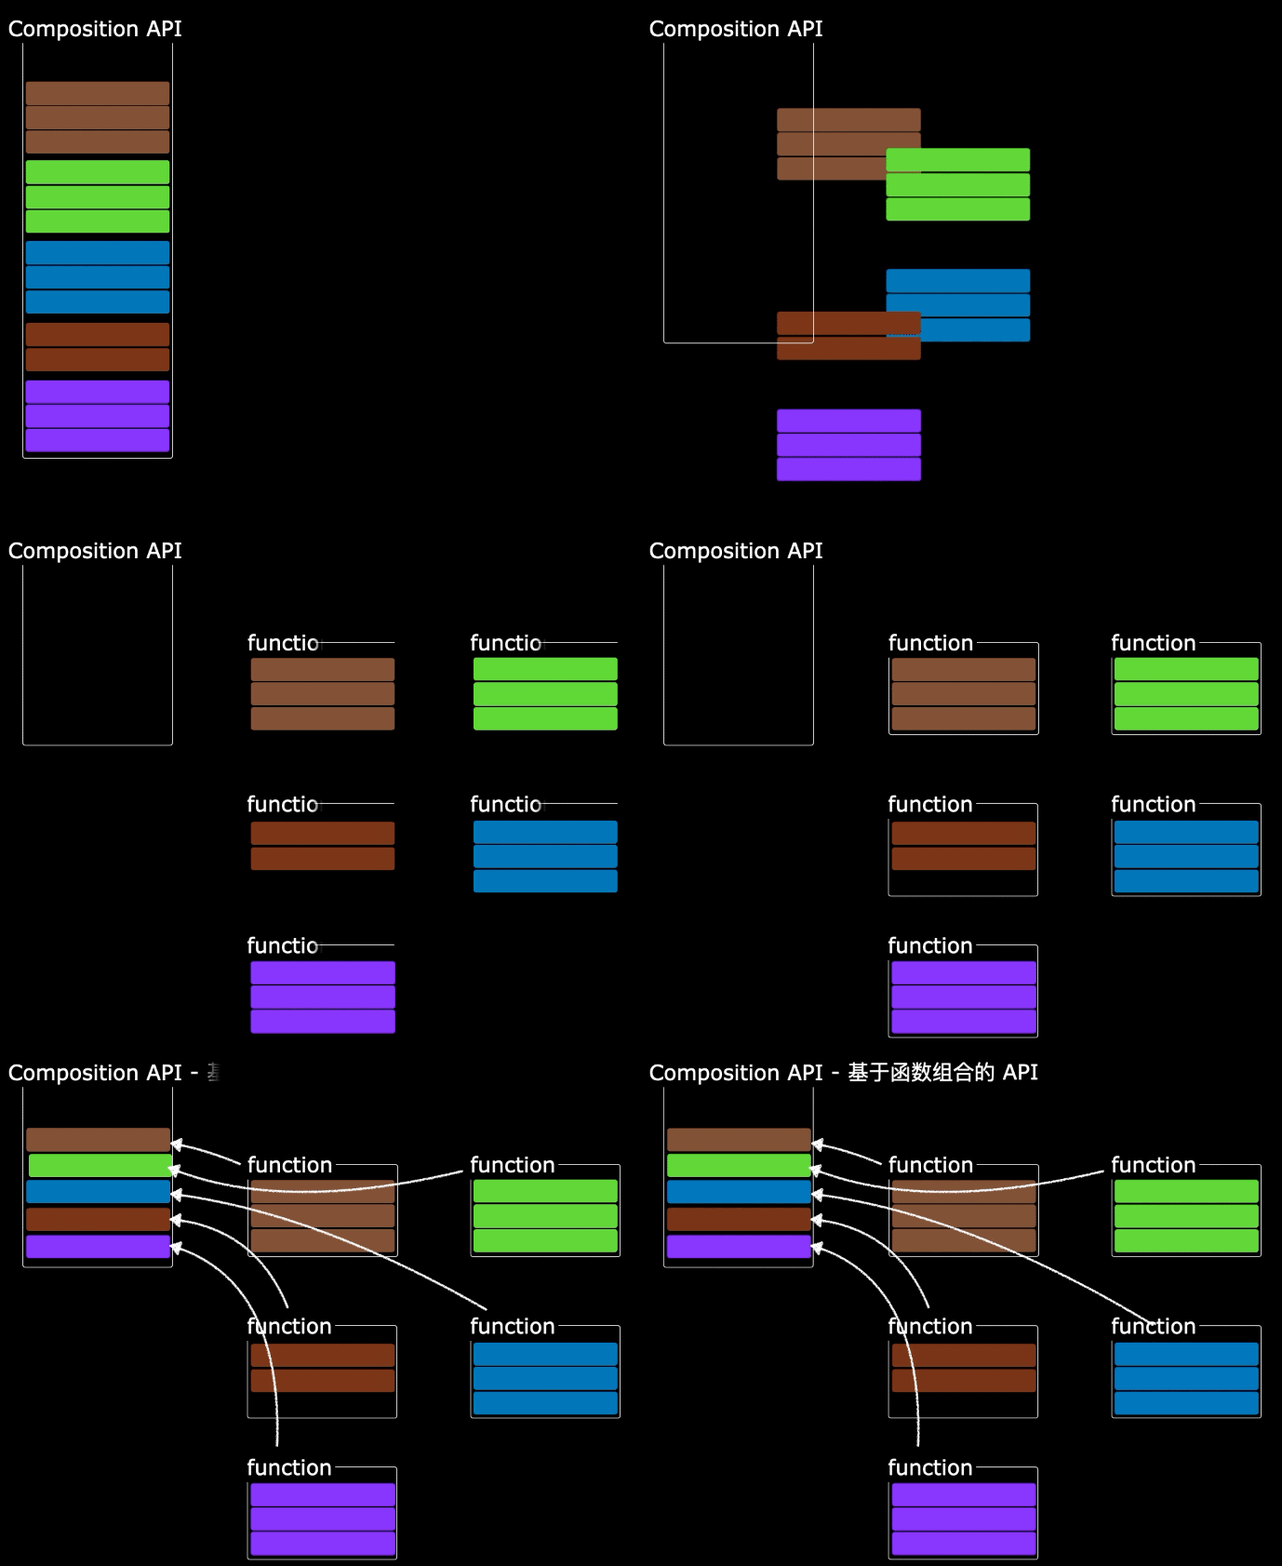
Composition API 的优势 可以用函数的方式,更加优雅的组织代码,让相关功能的代码更加有序的组织在一起。
创建一个vue3项目
进行相关的配置选择之后,就有了一个vue3项目,然后再对项目进行构建,运行
1
2
3
cd ./projectnpm install npm run dev
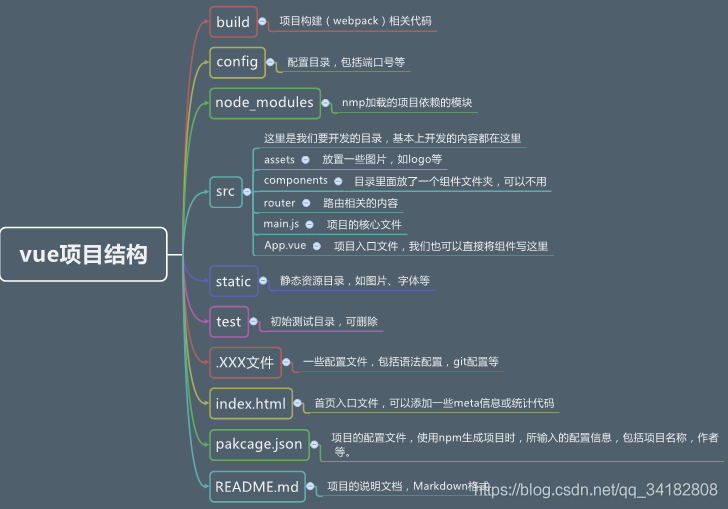
进入项目之后,查看项目结构,主要查看的是src目录和package.json文件.
删除多余的无用的生成代码,直接打开mian.js, 项目的主页是在index.html上
index.html
1
2
3
4
5
6
7
8
9
10
11
12
13
<!doctype html > <html lang ="en" > <head > <meta charset ="UTF-8" /> <link rel ="icon" type ="image/svg+xml" href ="/vite.svg" /> <meta name ="viewport" content ="width=device-width, initial-scale=1.0" /> <title > Vite + Vue + TS</title > </head > <body > <div id ="app" > </div > // app程序显示位置==> app.vue挂载位置 <script type ="module" src ="/src/main.ts" > </script > // 程序使用脚本===> main.js </body > </html >
App.vue
1
2
3
4
5
6
7
8
9
10
11
12
13
14
15
16
17
18
19
<script setup lang="ts"> import Person from './components/Person.vue' </script> <!--下面是vue2写法--> <script lang="ts"> import Person from './components/Person.vue' export default { name: 'App', // 组件名 一定要与文件名一致 components: { Person } // 注册组件 } </script> <template> </Person> <!--挂载组件位置--> </template> <style scoped></style>
main.js
1
2
3
4
5
import { createApp } from 'vue' import App from './App.vue' createApp (App ).mount ('#app' )
主要是组合式api几个需要注意的地方
从传统的选项式变成组合式
选项式
1
2
3
4
5
6
7
8
9
10
11
12
13
14
15
16
17
18
19
20
21
22
23
24
25
26
27
28
29
30
31
32
33
34
35
36
37
38
39
40
41
42
<script> export default { // data() 返回的属性将会成为响应式的状态 // 并且暴露在 `this` 上 // 数据 data() { return { count: 0 } }, // methods 是一些用来更改状态与触发更新的函数 // 它们可以在模板中作为事件处理器绑定 methods: { increment() { this.count++ } }, // 生命周期钩子会在组件生命周期的各个不同阶段被调用 // 例如这个函数就会在组件挂载完成后被调用 mounted() { console.log(`The initial count is ${this.count}.`) }, computed: { // 一个计算属性的 getter publishedBooksMessage() { // `this` 指向当前组件实例 return this.author.books.length > 0 ? 'Yes' : 'No' } }, watch: { // 每当 question 改变时,这个函数就会执行 question(newQuestion, oldQuestion) { if (newQuestion.includes('?')) { this.getAnswer() } } }, } </script>
相比较而言,选项式api耦合度高,不易进行项目调整
组合式api 💖💖💖
1
2
3
4
5
6
7
8
9
10
11
12
13
14
15
16
17
18
19
20
21
22
23
24
25
26
27
28
<script setup lang="ts"> import {ref,reactive} from 'vue' // 数据 let num = 123 // 不是响应式数据 let number = ref(123); // 相应式数据 // 方法 function changeNum(){ number.value++; // 只有相应式数据能够改变后正确显示出来 } // 计算属性 const sum = conputed(()=>{ return num+number.value // 注意ref响应式的数据需要在后面加上.value }) // 监视器 情况一 // 要么监视的是基本数据类型,直接obj就是数据就行了 watch(obj,(newValue,oldValue)=>{ console.log("情况一"); }) // 情况二 // 要么就是监视对象的某个属性,直接就用函数形式进行监视 watch(()=>obj.e,(newValue,oldValue)=>{ console.log("情况一"); },{deep:true}) // 需要深度监视就加上 </script>
注意,监视器只监视四种数据
ref定义的数据。reactive定义的数据。函数返回一个值(getter函数)。
一个包含上述内容的数组。
【注意】 若不了解对象是什么类型,直接打印,看到refImpl就是ref响应数据类型,看到proxyObject就是响应式对象数据类型
【注意】ref对象想获取数据,需要调用其value属性,但是reactive响应式对象想要获取数据,直接调用即可,因为reactive已经为响应式对象自动解构了,无需再调用value属性
标签属性的ref,主要是区别每个组件的唯一属性,起到让作用范围在组件内的作用
组件之间通信 使用defineProps接受数据
若只有单个数据,或者列表,直接接收即可
若是需要用到TS限制类型的,需要加上限制类型
1 defineProps<{list :Persons }>()
若是接收list+限制类型+限制必要性+指定默认值
1
2
3
withDefaults (defineProps<{list?:Persons }>(),{ list :()=> [{id :'123' ,name :'张三' ,age :18 }] })
vue声明周期
Vue2的生命周期
创建阶段:beforeCreate、created
挂载阶段:beforeMount、mounted
更新阶段:beforeUpdate、updated
销毁阶段:beforeDestroy、destroyed
Vue3的生命周期
创建阶段:setup 这个阶段自动执行钩子
挂载阶段:onBeforeMount、onMounted
更新阶段:onBeforeUpdate、onUpdated
卸载阶段:onBeforeUnmount、onUnmounted
常用的钩子:onMounted(挂载完毕)、onUpdated(更新完毕)、onBeforeUnmount(卸载之前)
hooks 主要就是发挥组合式api最大的功能
各个功能的数据和方法都存放到一个函数里面,然后再返回函数,通过调用函数解构出数据和方法,这种方式实现了低耦合
1 2 3 4 5 6 7 8 9 10 import {ref} from 'vue' export default function ( let sum = ref (0 ) function add ( return {sum,add} }
1 2 3 4 import useSum from '../hooks/useSum.ts' const {sum,add} = useSum ()
路由 安装插件
在main.js里面配置使用路由
1
2
3
4
5
6
7
import { createApp } from 'vue' import App from './App.vue' import router from './router' const app = createApp (App )app.use (router) app.mount ('#app' )
配置路由器 路径 @/router/index.ts
1 2 3 4 5 6 7 8 9 10 11 12 13 14 15 import { createRouter ,createWebHistory} from "vue-router" ;import Home from "../pages/Home.vue" ;const router = createRouter ({ history :createWebHistory (), routes : [ {path :'/home' ,component :Home } ] }) export default router
在组件中使用路由
1
2
3
4
5
6
7
8
9
10
11
12
13
14
15
16
17
18
19
<script setup lang="ts"> import { RouterView,RouterLink } from 'vue-router'; </script> <template> <div class="app"> <h2>路由配置</h2> <!-- 导航区域 --> <div class="navigate"> <!-- 这里使用RouterLink配置路由出口 --> <RouterLink to="/home" active-class="active">首页</RouterLink> </div> <!-- 展示区域 --> <div class="main-content"> <!-- 这里使用RouterView进行展示 --> <RouterView></RouterView> </div> </div> </template>
工作模式 路由器工作模式 两种工作模式传统模式和哈希模式
history模式
优点:URL更加美观,不带有#,更接近传统的网站URL。
缺点:后期项目上线,需要服务端配合处理路径问题,否则刷新会有404错误。
1
2
3
4
const router = createRouter ({ history :createWebHistory (), })
hash模式
优点:兼容性更好,因为不需要服务器端处理路径。
缺点:URL带有#不太美观,且在SEO优化方面相对较差。
1
2
3
4
const router = createRouter ({ history :createWebHashHistory (), })
路由更多配置【嵌套路由】 1 2 3 4 5 6 7 8 9 10 11 12 13 14 15 16 17 18 19 20 21 22 23 24 25 26 27 28 29 const router = createRouter ({ history :createWebHistory (), routes :[ { name :'zhuye' , path :'/home' , component :Home }, { name :'xinwen' , path :'/news' , component :News , children :[ { name :'xiang' , path :'detail' , component :Detail } ] }, { name :'guanyu' , path :'/about' , component :About } ] }) export default router
【query参数】
传递参数
1 2 3 4 5 6 7 8 9 10 11 12 13 14 15 16 17 18 19 <!-- 跳转并携带query参数(to的字符串写法) --> <router-link to="/news/detail?a=1&b=2&content=欢迎你"> 跳转 </router-link> <!-- 跳转并携带query参数(to的对象写法) --> <RouterLink :to="{ //name:'xiang', //用name也可以跳转 path:'/news/detail', query:{ id:news.id, title:news.title, content:news.content } }" > {{news.title}} </RouterLink>
接收参数:
1 2 3 4 import {useRoute} from 'vue-router' const route = useRoute ()console .log (route.query )
【params参数】
传递参数
1 2 3 4 5 6 7 8 9 10 11 12 13 14 15 16 <!-- 跳转并携带params参数(to的字符串写法) --> <RouterLink :to="`/news/detail/001/新闻001/内容001`">{{news.title}}</RouterLink> <!-- 跳转并携带params参数(to的对象写法) --> <RouterLink :to="{ name:'xiang', //用name跳转 params:{ id:news.id, title:news.title, content:news.title } }" > {{news.title}} </RouterLink>
接收参数:
1 2 3 4 import {useRoute} from 'vue-router' const route = useRoute ()console .log (route.params )
备注1:传递params参数时,若使用to的对象写法,**必须使用name配置项,不能用path**。
备注2:传递params参数时,需要提前在规则中占位。
【路由的props配置】 作用:让路由组件更方便的收到参数(可以将路由参数作为props传给组件)
1 2 3 4 5 6 7 8 9 10 11 12 13 14 15 16 { name :'xiang' , path :'detail/:id/:title/:content' , component :Detail , props (route ){ return route.query } }
【 replace属性】
作用:控制路由跳转时操作浏览器历史记录的模式。
浏览器的历史记录有两种写入方式:分别为push和replace:
push是追加历史记录(默认值)。replace是替换当前记录。
开启replace模式:
1 <RouterLink replace .......>News</RouterLink>
【编程式导航】 路由组件的两个重要的属性:$route和$router变成了两个hooks
1 2 3 4 5 6 7 8 9 import {useRoute,useRouter} from 'vue-router' const route = useRoute ()const router = useRouter ()console .log (route.query )console .log (route.parmas )console .log (router.push )console .log (router.replace )
【重定向】
作用:将特定的路径,重新定向到已有路由。
具体编码:
1 2 3 4 { path :'/' , redirect :'/about' }
Pinia 集中式状态管理工具
多个组件共享数据才考虑使用pinia
安装 引入pinia main.js
1 2 3 4 5 6 7 8 9 10 11 import { createApp } from 'vue' import App from './App.vue' import {createPinia} from 'pinia' const app = createApp (App )const pinia = createPinia ()app.use (pinia) app.mount ('#app' )
使用pinia 首先进行创建stroe文件夹,主要用于存储静态数据
在stroe中创建对于组件的ts文件
1 2 3 4 5 6 7 8 import { defineStore } from "pinia" import { ref } from "vue" let sum = ref (6 )export const useCountStore = defineStore ('Count' ,{ state ( return {sum} } })
各种各样的store是由defineStore() 定义的,它的第一个参数要求是一个独一无二的名字,名字被用作与id,必须填写 后面的对象可以接收option对象或者setup函数
Option Store 1 2 3 4 5 6 7 8 9 10 11 12 13 14 15 16 17 18 19 20 21 22 23 24 25 26 27 28 29 30 31 32 import { defineStore } from "pinia" import { ref } from "vue" let sum = ref (6 )let num = ref (1 )export const useCountStore = defineStore ('Count' , { state ( return { sum ,num } }, actions : { add (value: number ) { if (this .sum < 10 ) { this .sum += value } }, sub (value:number ){ this .sum -=value } }, getters : { bigSum : (state): number => return state.sum * 10 } } })
1 2 3 4 5 6 7 <!-- vue组件中使用 --> <script setup lang="ts"> const countStore = useCountStore() // 这里要想使用响应式数据,必须使用storeToRefs把store中的数据转成响应式的,而没有对方法函数进行转换,若使用ToRefs,就会进行全部转换 const { sum, num, bigSum } = storeToRefs(countStore) const { add,sub } = countStore </script>
Setup Store 使用组合式store,先定义一个箭头函数,然后直接写数据,方法,最后返回即可
1 2 3 4 5 6 7 8 9 10 11 12 13 14 15 16 17 18 19 20 21 22 23 24 25 import axios from "axios" ;import { defineStore } from "pinia" ;import { reactive } from "vue" ;import {nanoid} from 'nanoid' ;export const useFightWords = defineStore ('FightWords' ,()=> { const words = reactive (JSON .parse (localStorage .getItem ('fightWords' ) as string )|| [{id :'1jsdio3' ,text :'落子无悔' },{id :'jiofd233' ,text :'进无可退' },{id :'fjdio34' ,text :'未来可期' }]) async function addWord ( const {data :{data}} = await axios.get ("https://api.vvhan.com/api/dailyEnglish" ) console .log (data.zh ) words.unshift ({id :nanoid,text :data.zh }) localStorage .setItem ('fightWords' ,JSON .stringify (words)) } return {words,addWord} })
1 2 3 4 5 6 7 8 9 <!-- vue组件中使用 --> <script setup lang="ts"> //使用pinia const fightWord = useFightWords() // 数据 const {words} = storeToRefs(fightWord) // 方法 const {addWord} = fightWord </script>
组件通信 组件与组件之间的通信
props
其根本就是使用属性进行传参,:car =”car “,
使用频率最高的传递方式,通常就是父与子 之间的传递
【注意】
父传子
1 2 3 4 5 6 7 8 9 10 11 12 13 14 <template> <div class="father"> <h3>父组件</h3> <h4 v-show="bmw">车:{{ bmw }}</h4> <!-- 因为这里使用的是属性的传递方式,所以父传子只有值传递,不能传递函数 --> <Child :car="bmw" /> </div> </template> <script setup lang="ts" name="Father"> import Child from './Child.vue'; import { ref } from 'vue'; const bmw = ref('奔驰') </script>
子接收
1 2 3 4 5 6 7 8 9 10 <template> <div class="child"> <h3>子组件</h3> <h4 v-show="car">接收到父的车:{{ car }}</h4> </div> </template> <script setup lang="ts" name="Child"> // 对父传递的进行接收 defineProps(['car']) </script>
子传父
1 2 3 4 5 6 7 8 9 10 11 12 13 <template> <div class="child"> <h3>子组件</h3> <button @click="getToy(toy)">向父亲发送玩具</button> </div> </template> <script setup lang="ts" name="Child"> import { ref } from 'vue'; let toy = ref('玩具龙') // 对父传递的进行接收 接收一个方法 在点击事件触发的时候传参 defineProps(['getToy']) </script>
父接收
1 2 3 4 5 6 7 8 9 10 11 12 13 14 15 16 17 <template> <div class="father"> <h3>父组件</h3> <h4 v-show="toy">子的玩具:{{toy}}</h4> <!-- 因为这里使用的是属性的传递方式,所以父传子只有值传递,不能传递函数 --> <Child :getToy="getToy" /> </div> </template> <script setup lang="ts" name="Father"> import Child from './Child.vue'; import { ref } from 'vue'; const toy = ref('') // 调用的时候接收子传递过来的参数 function getToy(value:string){ toy.value = value }
自定义事件
利用自定义事件进行传参,主要用于子传父
父定义自定义事件
1 2 3 4 5 6 7 8 9 10 11 12 13 14 15 16 <template> <div class="father"> <h3>父组件</h3> <h4 v-show="toy">子给的玩具:{{ toy }}</h4> <!-- 利用事件进行传参 --> <Child @send-toy="getToy"/> </div> </template> <script setup lang="ts" name="Father"> import Child from './Child.vue'; import {ref} from 'vue' const toy = ref('') function getToy(value:string){ toy.value = value } </script>
子进行接收、传参 使用emit 函数进行对事件的触发
1 2 3 4 5 6 7 8 9 10 11 12 13 14 15 <template> <div class="child"> <h3>子组件</h3> <h4>玩具:{{ toy }}</h4> <button @click="emit('send-toy',toy)">发送玩具</button> </div> </template> <script setup lang="ts" name="Child"> import {ref} from 'vue' const toy = ref('玩具龙') // 使用emit进行接收 const emit = defineEmits(['send-toy']) // emit('事件名',参数) 这样就可以触发事件了 </script>
mitt 实现任意组件通信
通过emitter的代理方式,实现任意两个组件之间的通信
需要提前配置
配置
1 2 3 4 5 6 import mitt from 'mitt' const emitter = mitt ()export default emitter
emitter的使用
1 2 3 4 5 6 7 8 emitter.on ('事件名' ,(参数 )=> {}) emitter.emit ('事件名' ,参数) emitter.off ('事件名' ) emitter.all .clear ()
任意两个组件之间通信
首先一个组件进行绑定,先绑定再触发,绑定的往往是接收数据
1 2 3 4 5 6 7 8 9 10 11 12 13 14 15 16 <template> <div class="child2"> <h3>子组件2</h3> <h4>电脑:{{ computer }}</h4> <h4 v-show="toy">哥哥给的玩具:{{ toy }}</h4> </div> </template> <script setup lang="ts" name="Child2"> import { ref } from 'vue'; import emitter from '../../utils/emitter'; const toy = ref('') emitter.on('getToy',(value:any)=>{ toy.value = value }) const computer = ref('mac')
然后另一个组件进行触发,并发送参数
1 2 3 4 5 6 7 8 9 10 11 12 13 14 15 16 17 <template> <div class="child1"> <h3>子组件1</h3> <h4>玩具:{{ toy }}</h4> <!-- 这里选择使用按钮的方式触发,再调用emit函数时加上参数 --> <button @click="emitter.emit('getToy',toy)">哥哥的玩具给弟弟玩</button> </div> </template> <script setup lang="ts" name="Child1"> import {ref} from 'vue' // 导入mitt import emitter from '../../utils/emitter' // 数据 const toy = ref('奥特曼') </script>
v-model
主要是用于ui组件的数据传递
在html标签上写v-model标志着双向绑定,在组件标签上写v-model标志着一种组件通信
1 2 3 4 5 6 7 8 9 10 11 12 <!-- v-model用在html标签上 实际等价于--> <input type="text" v-model="username"> <input type="text" :value="username" @input="username = (<HTMLInputElement>$event.target).value"> <!-- v-model用在组件标签上 实际等价于--> <AtguiguInput v-model="username"/> <AtguiguInput :modelValue="username" @update:modelValue="username = $event" /> <!-- 修改modelValue 自定义命名--> <AtguiguInput v-model:ming="username" v-model:mima="password"/>
$attrs
主要用于祖孙之间的通信
爷爷
1 2 3 4 5 6 7 8 9 10 11 12 13 14 15 16 17 18 19 20 21 22 23 24 <template> <div class="father"> <h3>父组件</h3> <h4>a:{{a}}</h4> <h4>b:{{b}}</h4> <h4>c:{{c}}</h4> <h4>d:{{d}}</h4> <Child :a="a" :b="b" :c="c" :d="d" v-bind="{x:100,y:200}" :updateA="updateA"/> </div> </template> <script setup lang="ts" name="Father"> import Child from './Child.vue' import {ref} from 'vue' let a = ref(1) let b = ref(2) let c = ref(3) let d = ref(4) function updateA(value:number){ a.value += value } </script>
子组件 中间传递使用$attrs保存参数 然后使用v-bind进行数据传递
1 2 3 4 5 6 7 8 9 10 <template> <div class="child"> <h3>子组件</h3> <GrandChild v-bind="$attrs"/> </div> </template> <script setup lang="ts" name="Child"> import GrandChild from './GrandChild.vue' </script>
孙组件 使用props接收即可
1 2 3 4 5 6 7 8 9 10 11 12 13 14 15 16 <template> <div class="grand-child"> <h3>孙组件</h3> <h4>a:{{ a }}</h4> <h4>b:{{ b }}</h4> <h4>c:{{ c }}</h4> <h4>d:{{ d }}</h4> <h4>x:{{ x }}</h4> <h4>y:{{ y }}</h4> <button @click="updateA(6)">点我将爷爷那的a更新</button> </div> </template> <script setup lang="ts" name="GrandChild"> defineProps(['a','b','c','d','x','y','updateA']) </script>
$refs-$parent $refs用于父传子,而$parent用于子传父,无论使用refs还是parent,都需要使用到defineExpose向外部提供数据
1 2 3 4 5 6 7 8 9 10 11 12 13 14 15 16 17 18 19 20 21 22 23 24 25 26 27 28 29 30 31 32 33 34 35 36 37 38 39 40 <template> <div class="father"> <h3>父组件</h3> <h4>房产:{{ house }}</h4> <button @click="changeToy">修改Child1的玩具</button> <button @click="changeComputer">修改Child2的电脑</button> <button @click="getAllChild($refs)">让所有孩子的书变多</button> <Child1 ref="c1"/> <Child2 ref="c2"/> </div> </template> <script setup lang="ts" name="Father"> import Child1 from './Child1.vue' import Child2 from './Child2.vue' import { ref } from "vue"; let c1 = ref() let c2 = ref() // 数据 let house = ref(4) // 方法 function changeToy(){ c1.value.toy = '小猪佩奇' } function changeComputer(){ c2.value.computer = '华为' } function getAllChild(refs:{[key:string]:any}){ // 这里打印的是两个对象组成的数组 console.log(refs) // for in 循环用于循环对象里面的每个属性的属性值,而in前面的变量(key)指的是属性名称,可以使用对象[属性名]的方式调用属性值 for (let key in refs){ refs[key].book += 3 } } // 向外部提供数据 defineExpose({house}) </script>
1 2 3 4 5 6 7 8 9 10 11 12 13 14 15 16 17 18 19 20 21 22 23 24 25 26 27 28 29 30 31 32 33 34 <template> <div class="child1"> <h3>子组件1</h3> <h4>玩具:{{ toy }}</h4> <h4>书籍:{{ book }} 本</h4> <!-- 这里的parent是父亲暴露出来的 --> <button @click="minusHouse($parent)">干掉父亲的一套房产</button> </div> </template> <script setup lang="ts" name="Child1"> import { ref } from "vue"; // 数据 let toy = ref('奥特曼') let book = ref(3) // 方法 function minusHouse(parent:any){ parent.house -= 1 } // 把数据交给外部 defineExpose({toy,book}) </script> <style scoped> .child1{ margin-top: 20px; background-color: skyblue; padding: 20px; border-radius: 10px; box-shadow: 0 0 10px black; } </style>
provide-inject
provide提供的函数可以给子孙组件传参数,子孙组件通过使用inject进行注入,子孙组件也可以通过调用方法来反向传参
1 2 3 4 5 6 7 8 9 10 11 12 13 14 15 16 17 18 19 20 21 22 23 24 25 26 27 <template> <div class="father"> <h3>父组件</h3> <h4>银子:{{ money }}万元</h4> <h4>车子:一辆{{car.brand}}车,价值{{car.price}}万元</h4> <Child/> </div> </template> <script setup lang="ts" name="Father"> import Child from './Child.vue' import {ref,reactive,provide} from 'vue' let money = ref(100) let car = reactive({ brand:'奔驰', price:100 }) function updateMoney(value:number){ money.value -= value } // 向后代提供数据 provide('moneyContext',{money,updateMoney}) provide('car',car) </script>
1 2 3 4 5 6 7 8 9 10 11 12 13 14 15 <template> <div class="grand-child"> <h3>我是孙组件</h3> <h4>银子:{{ money }}</h4> <h4>车子:一辆{{car.brand}}车,价值{{car.price}}万元</h4> <button @click="updateMoney(6)">花爷爷的钱</button> </div> </template> <script setup lang="ts" name="GrandChild"> import { inject } from "vue"; let {money,updateMoney} = inject('moneyContext',{money:0,updateMoney:(param:number)=>{}}) let car = inject('car',{brand:'未知',price:0}) </script>
slot 插槽 默认插槽
原本在组件里写东西是不会插入到组件的 代码里的,但是在组件的指定位置注入<slot></slot>标签,就会把内容自动插入到该位置
1 2 3 4 5 6 7 8 9 10 11 12 13 14 15 16 17 <template> <div class="father"> <h3>父组件</h3> <div class="content"> <Category title="今日美食城市"> <img :src="imgUrl" alt=""> </Category> </div> </div> </template> <script setup lang="ts" name="Father"> import Category from './Category.vue' import { ref} from "vue"; let imgUrl = ref('https://z1.ax1x.com/2023/11/19/piNxLo4.jpg') </script>
1 2 3 4 5 6 7 8 9 10 <template> <div class="category"> <h2>{{title}}</h2> <slot>默认内容</slot> </div> </template> <script setup lang="ts" name="Category"> defineProps(['title']) </script>
具名插槽
1 2 3 4 5 6 7 8 9 10 11 12 13 14 15 16 17 18 19 20 21 22 23 24 <template> <div class="father"> <h3>父组件</h3> <div class="content"> <Category> <!-- 插入s2的插槽 --> <template v-slot:s2> <img :src="imgUrl" alt=""> </template> <!-- 插入s1的插槽 这里直接写#插槽name也可以--> <template #s1> <h2>今日美食推荐</h2> </template> </Category> </div> </div> </template> <script setup lang="ts" name="Father"> import Category from './Category.vue' import { ref} from "vue"; let imgUrl = ref('https://z1.ax1x.com/2023/11/19/piNxLo4.jpg') </script>
1 2 3 4 5 6 <template> <div class="category"> <slot name="s1">默认内容1</slot> <slot name="s2">默认内容2</slot> </div> </template>
这里#表示插槽名字 #s1=v-slot:s2
1 2 3 4 <!-- 插入s1的插槽 这里直接写#插槽name也可以--> <template #s1> <h2>今日美食推荐</h2> </template>
作用域插槽
数据在子那边,但数据的结构在父那边,所以需要子把数据传递给父,所以需要用到v-slot处理数据
1 2 3 4 5 6 7 8 9 10 11 12 13 14 15 16 17 18 19 20 <template> <div class="father"> <h3>父组件</h3> <div class="content"> <Game> <!-- 这里接收传递过来的数据,以对象的方式传递slot标签上的所有属性 同样可以指定插槽的名字--> <template v-slot:qwe="params"> <ul> <li v-for="y in params.youxi" :key="y.id"> {{ y.name }} </li> </ul> </template> </Game> </div> </div> </template> <script setup lang="ts" name="Father"> import Game from './Game.vue' </script>
1 2 3 4 5 6 7 8 9 10 11 12 13 14 15 16 17 <template> <div class="game"> <h2>游戏列表</h2> <!-- 这里使用属性传递给template上 不影响具名插槽的使用--> <slot name="qwe" :youxi="games" x="哈哈" y="你好"></slot> </div> </template> <script setup lang="ts" name="Game"> import {reactive} from 'vue' let games = reactive([ {id:'asgytdfats01',name:'英雄联盟'}, {id:'asgytdfats02',name:'王者农药'}, {id:'asgytdfats03',name:'红色警戒'}, {id:'asgytdfats04',name:'斗罗大陆'} ]) </script>
插槽总结
组件关系
传递方式
父传子
props、v-model、$refs、默认插槽/具名插槽
子传父
props、自定义事件、v-model、$parent、作用域插槽
祖传孙/孙传祖
$attrs、provide-inject
兄弟之间/任意组件
mitt、pinia
其他API shallowRef 浅层次的响应式数据使用,只能响应式修改第一层数据,提高性能
shallowReactive 浅层次的响应式对象使用,只能响应式修改整个对象属性,不能一个一个属性修改,可以提高性能
readonly 让一个ref对象变成只读状态,但是具有关联性
shallowReadonly 让一个ref对象变成浅层次只读状态,深层次还是可以修改的
toRaw 让一个响应式的对象变成一个原始对象
markRaw 标记一个对象,使其永远不会变成响应式对象
customRef 自定义ref
1 2 3 4 5 6 7 8 9 10 11 12 13 14 import { customRef } from 'vue'; let refObj = customRef((track,trigger)=>{ return { // 当obj被读取的时候调用get() get(){ track() // 告诉vue数据obj很重要,一但数据变化,就要去更新 return '你好' }, // 当obj被修改的时候调用set() set(value){ trigger() // 数据全部更新好了之后,通知vue数据变化了 } } })
teleport 传送门,把代码塞到to指定的标签内
1 2 3 <teleport to="body"> <span>内容</span> </teleport>
suspense 当setup里面有异步任务(发送请求)的时候,就需要这个来进行处理
首先需要在该组件的父组件进行包裹
1 2 3 4 5 6 7 8 9 10 11 12 13 14 15 16 17 18 19 <template> <div class="app"> <Suspense> <!-- 下面这个插槽是当异步任务处理结束才出现--> <template v-shot:default> <!-- 当这个子组件的setup里面直接出现了异步任务 就需要使用suspense--> <Child/> </template> <!-- 下面这个插槽是当异步任务未结束出现,结束了就不出现--> <template v-shot:fallback> <h2>加载中</h2> </template> </Suspense> </div> </template> <script setup lang="ts"> import { Suspense } from 'vue'; import Child from '../Child.vue'; </script>
全局API转移到应用对象
app.component 全局组件app.config 全局配置app.directive 全局样式app.mount app挂载app.unmount app卸载app.use app应用
其他
过渡类名 v-enter 修改为 v-enter-from、过渡类名 v-leave 修改为 v-leave-from。
keyCode 作为 v-on 修饰符的支持。
v-model 指令在组件上的使用已经被重新设计,替换掉了 v-bind.sync。
v-if 和 v-for 在同一个元素身上使用时的优先级发生了变化。
移除了$on、$off 和 $once 实例方法。
移除了过滤器 filter。
移除了$children 实例 propert。
