Git
git工作流程
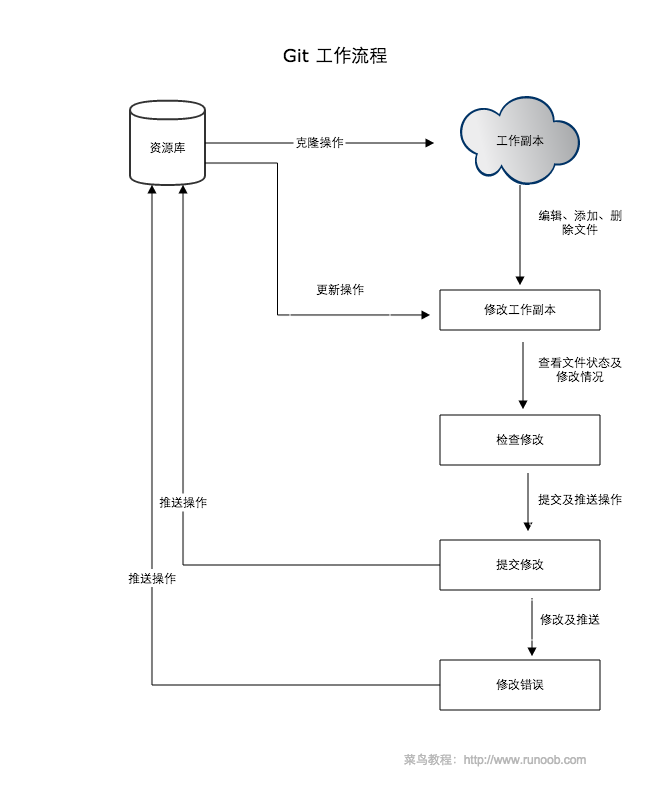
以下是git的工作流程

工作大致就是三个操作:修改、提交、推送
git工作区
- 工作区:就是平常的工作目录,项目文件夹
- **暂存区(stage/index)**:存放在
.git目录下面的index文件夹下面 有时也叫索引区
- 版本库:工作区一个隐藏目录
.git,这个文件夹就是git的版本库

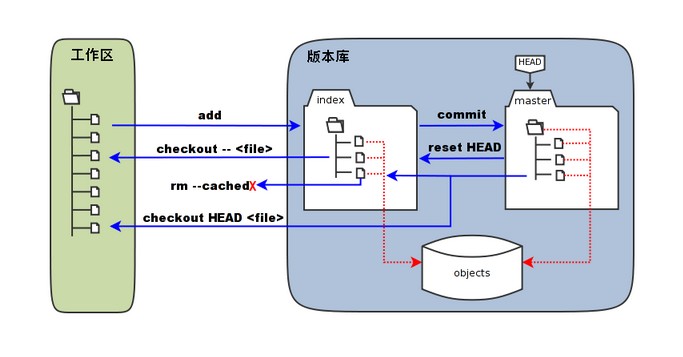
- 图中左侧为工作区,右侧为版本库。在版本库中标记为 “index” 的区域是暂存区(stage/index),标记为 “master” 的是 master 分支所代表的目录树。
- 图中我们可以看出此时 “HEAD” 实际是指向 master 分支的一个”游标”。所以图示的命令中出现 HEAD 的地方可以用 master 来替换。
- 图中的 objects 标识的区域为 Git 的对象库,实际位于 “.git/objects” 目录下,里面包含了创建的各种对象及内容。
- 当对工作区修改(或新增)的文件执行
git add 命令时,暂存区的目录树被更新,同时工作区修改(或新增)的文件内容被写入到对象库中的一个新的对象中,而该对象的ID被记录在暂存区的文件索引中。
- 当执行提交操作(git commit)时,暂存区的目录树写到版本库(对象库)中,master 分支会做相应的更新。即 master 指向的目录树就是提交时暂存区的目录树。
- 当执行
git reset HEAD命令时,暂存区的目录树会被重写,被 master 分支指向的目录树所替换,但是工作区不受影响。
- 当执行
git rm --cached <file> 命令时,会直接从暂存区删除文件,工作区则不做出改变。
- 当执行
git checkout . 或者 git checkout -- <file> 命令时,会用暂存区全部或指定的文件替换工作区的文件。这个操作很危险,会清除工作区中未添加到暂存区中的改动。
- 当执行
git checkout HEAD . 或者 git checkout HEAD <file>命令时,会用 HEAD 指向的 master 分支中的全部或者部分文件替换暂存区和以及工作区中的文件。这个命令也是极具危险性的,因为不但会清除工作区中未提交的改动,也会清除暂存区中未提交的改动。
git创建仓库
当前文件夹创建仓库
指定文件夹创建仓库
克隆仓库
1
| git clone <repo> <directory>
|
配置
1
2
3
| git config --list
git config -e
git config -e --global
|
设置提交代码的用户
1
2
| git config --global user.name "runoob"
git config --global user.email test@runoob.com
|
git基本操作
Git 的工作就是创建和保存你项目的快照及与之后的快照进行对比。
Git 常用的是以下 6 个命令:git clone、git push、git add 、git commit、git checkout、git pull

说明:
- workspace:工作区
- staging area:暂存区/缓存区
- local repository:版本库或本地仓库
- remote repository:远程仓库
基本操作
1
2
3
4
5
6
| git init
git add .
git commit
git commit -am
|
创建仓库命令
提交与修改
1
2
3
4
5
6
7
| git add
git status
git diff
git commit
git reset
git rm
git mv
|
提交日志
1
2
| git log
git blame <file>
|
远程操作
1
2
3
4
| git remote
git fetch
git pull
git push
|
git分支管理
创建分支
1
2
3
| git branch (branchname)
或
git switch -c (branchname)
|
切换分支
1
2
| git checked (branchname)
git switch (brachname)
|
当你切换分支的时候,Git 会用该分支的最后提交的快照替换你的工作目录的内容, 所以多个分支不需要多个目录
合并分支
你可以多次合并到统一分支, 也可以选择在合并之后直接删除被并入的分支
实例
1
2
3
4
5
6
7
8
9
10
| $ mkdir gitdemo
$ cd gitdemo/
$ git init
Initialized empty Git repository...
$ touch README
$ git add README
$ git commit -m '第一次版本提交'
[master (root-commit) 3b58100] 第一次版本提交
1 file changed, 0 insertions(+), 0 deletions(-)
create mode 100644 README
|
列出分支
列出分支基本命令
没有参数的时候,默认是所在的本地分支
当执行git init的时候,git会默认创建master分支 如果需要手动创建一个分支,执行``git branch (branchname) `
1
2
3
4
| $ git branch testing
$ git branch
* master
testing
|
新建一个分支之后,如果后面又有了提交的更新,然后有切换到了testing分支,git将还原你的工作目录到创建分支的样子
实例2
1
2
3
4
5
6
7
8
9
10
11
12
13
14
| $ ls
README
$ echo 'runoob.com' > test.txt
$ git add .
$ git commit -m 'add test.txt'
[master 3e92c19] add test.txt
1 file changed, 1 insertion(+)
create mode 100644 test.txt
$ ls
README test.txt
$ git checkout testing
Switched to branch 'testing'
$ ls
README
|
当在master添加一个文件到暂存区之后,然后提交到本地仓库之后
再切换到testin分支的时候 发现添加的test.txt文件没了,但是切换到master分支的时候,它又重新出现了
1
2
3
4
| $ git checkout master
Switched to branch 'master'
$ ls
README test.txt
|
我们也可以使用 git checkout -b (branchname)/git switch -c (branchname) 命令来创建新分支并立即切换到该分支下,从而在该分支中操作。
1
2
3
4
5
6
7
8
9
10
11
12
13
14
15
16
17
18
19
20
21
| $ git checkout -b newtest
Switched to a new branch 'newtest'
$ ls
README.md test.txt
$ git rm test.txt
rm 'test.txt'
$ ls
README
$ touch runoob.php
$ git add .
$ git commit -am 'removed test.txt、add runoob.php'
[newtest c1501a2] removed test.txt、add runoob.php
2 files changed, 1 deletion(-)
create mode 100644 runoob.php
delete mode 100644 test.txt
$ ls
README runoob.php
$ git checkout master
Switched to branch 'master'
$ ls
README test.txt
|
当创建了一个分支,在该分支上移除了一些文件 test.txt,并添加了 znxs.php 文件,然后切换回我们的主分支,删除的 test.txt 文件又回来了,且新增加的 znxs.php 不存在主分支中。
使用分支将工作切分开来,从而让我们能够在不同开发环境中做事,并来回切换。
删除分支
删除分支命令
1
| git branch -d (branchname)
|
如果要删除testing分支
1
2
3
4
5
6
7
8
9
| $ git branch
* master
testing
newTest
$ git branch -d testing
Deleted branch testing (was 85fc7e7).
$ git branch
* master
newTest
|
分支合并
一旦某分支有了独立内容,你终究会希望将它合并回到你的主分支。 你可以使用以下命令将任何分支合并到当前分支中去:
1
2
3
4
5
6
7
8
9
10
11
12
13
14
15
16
| git merge
$ git branch
* master
newTest
$ ls
README test.txt
$ git merge newTest
Updating 3e92c19..c1501a2
Fast-forward
znxs.php | 0
test.txt | 1 -
2 files changed, 1 deletion(-)
create mode 100644 znxs.php
delete mode 100644 test.txt
$ ls
README znxs.php
|
将 newtest 分支合并到主分支去,test.txt 文件被删除
合并冲突
合并并不仅仅是简单的文件添加、移除的操作,Git 也会合并修改。
1
2
3
4
| $ git branch
* master
newTest
$ cat znxs.php
|
新建一个分支changeTest 切换过去,将znxs.php内容修改为
提交
1
| git commit -am 'changed the znxs.php'
|
修改的内容提交到 change_site 分支中。 现在,假如切换回 master 分支我们可以看内容恢复到我们修改前的(空文件,没有代码),我们再次修改 znxs.php 文件。
1
2
3
4
5
6
7
8
9
10
11
12
13
14
15
16
17
18
19
20
| $ git checkout master
Switched to branch 'master'
$ cat znxs.php
$ vim znxs.php
$ cat znxs.php
<?php
echo 1;
?>
$ git diff
diff --git a/znxs.php b/znxs.php
index e69de29..ac60739 100644
--- a/znxs.php
+++ b/znxs.php
@@ -0,0 +1,3 @@
+<?php
+echo 1;
+?>
$ git commit -am '修改代码'
[master c68142b] 修改代码
1 file changed, 3 insertions(+)
|
现在这些改变已经记录到我的 “master” 分支了。接下来我们将 “change_site” 分支合并过来。
1
2
3
4
5
6
7
8
9
10
11
12
13
| $ git merge change_site
Auto-merging znxs.php
CONFLICT (content): Merge conflict in znxs.php
Automatic merge failed; fix conflicts and then commit the result.
$ cat znxs.php
<?php
<<<<<<< HEAD
echo 1;
=======
echo 'znxs';
>>>>>>> change_site
?>
|
我们将前一个分支合并到 master 分支,一个合并冲突就出现了,接下来我们需要手动去修改它。
1
2
3
4
5
6
7
8
9
10
11
12
13
14
15
16
| $ vim znxs.php
$ cat znxs.php
<?php
echo 1;
echo 'znxs';
?>
$ git diff
diff --cc znxs.php
index ac60739,b63d7d7..0000000
--- a/runoob.php
+++ b/runoob.php
@@@ -1,3 -1,3 +1,4 @@@
<?php
+echo 1;
+ echo 'znxs';
?>
|
在 Git 中,我们可以用 git add 要告诉 Git 文件冲突已经解决
1
2
3
4
5
6
7
| $ git status -s
UU runoob.php
$ git add runoob.php
$ git status -s
M runoob.php
$ git commit
[master 88afe0e] Merge branch 'change_site'
|
现在成功解决了合并中的冲突,并提交了结果
git标签
当使用版本更新,或者一个比较重要的阶段,需要对快照进行标记,就可以对快照打上标签git tag
例如 user_center发布了一年版本大更新 可以用git tag -a v1.0打上(HEAD)v1.0标签
-a表示带上注解的标签
当执行git tag -a命令的时候 git可能会打开编辑器写一句注解
查看标签
如果要查看所有的标签可以使用以下命令
指定标签信息命令
1
| git tag -a <tagname> -m "znxs.com标签"
|
PGP标签命令
1
| git tag -s <tagname> -m "znxs.com标签"
|

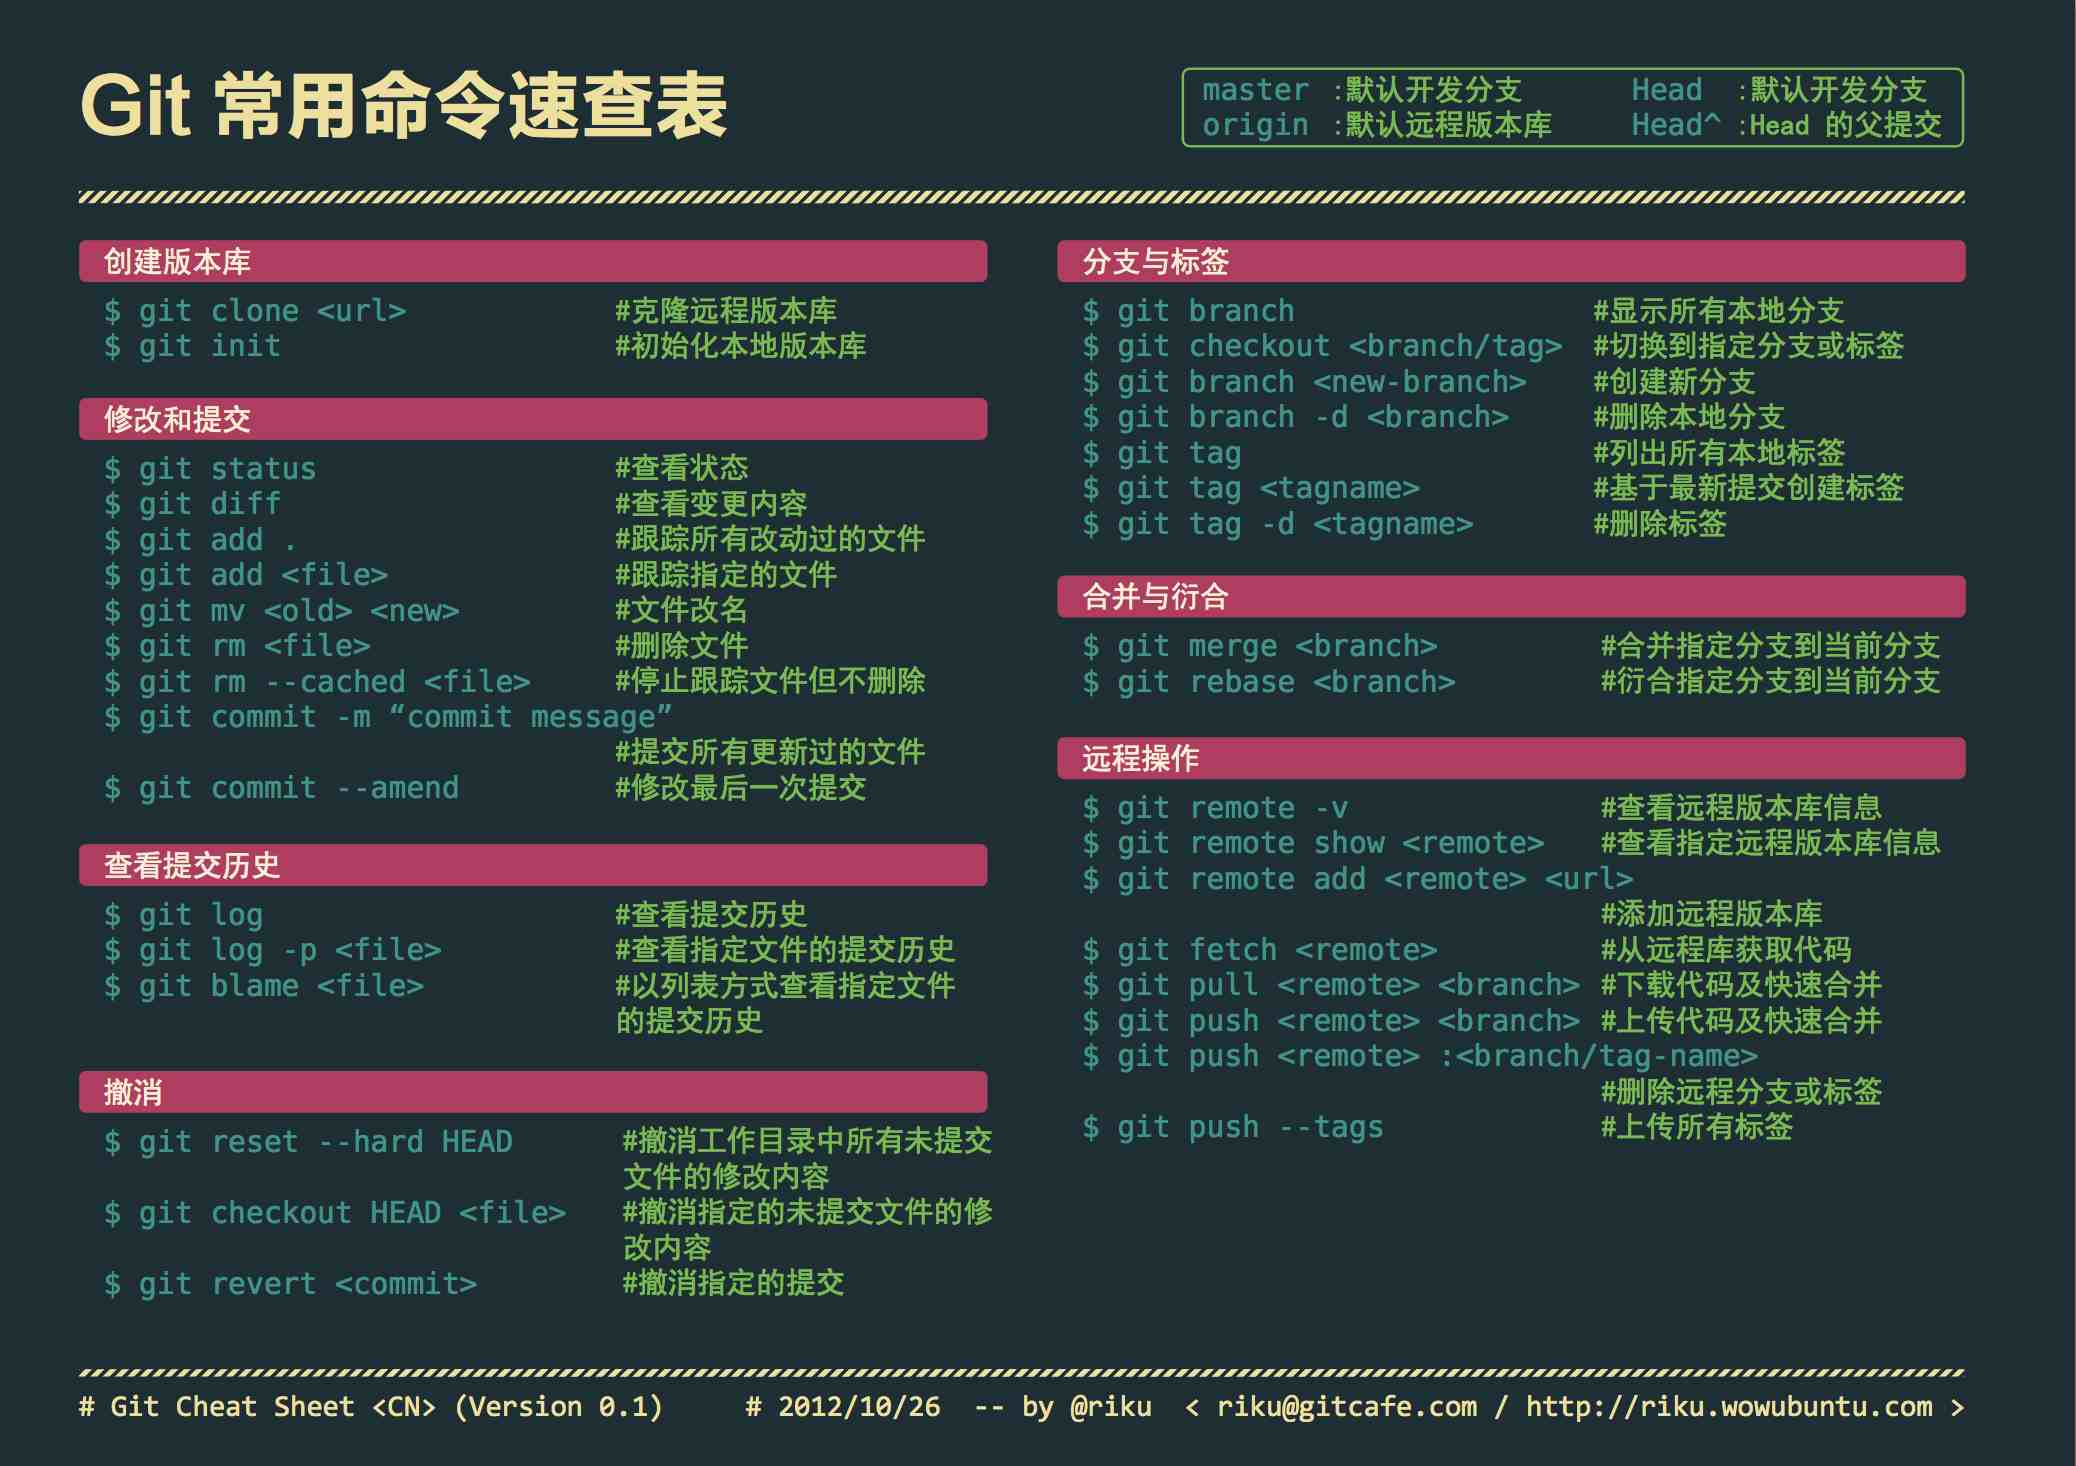
git命令大全
1
2
3
4
5
6
7
8
9
10
11
12
13
14
15
16
17
18
19
20
21
22
23
24
25
26
27
28
29
30
31
32
33
34
35
36
37
38
39
40
41
42
43
44
45
46
47
48
49
50
51
52
53
54
55
56
57
58
59
60
61
62
63
64
65
66
67
68
69
70
71
72
73
74
75
76
77
78
79
80
81
82
83
84
85
86
| git init
git config --global user.name "xxx"
git config --global user.email "xxx@xxx.com"
git config --global color.ui true
git config --global color.status auto
git config --global color.diff auto
git config --global color.branch auto
git config --global color.interactive auto
git config --global --unset http.proxy
git clone git+ssh://git@192.168.53.168/VT.git
git status
git add xyz
git add .
git commit -m 'xxx'
git commit --amend -m 'xxx'
git commit -am 'xxx'
git rm xxx
git rm -r *
git log
git log -1
git log -5
git log --stat
git log -p -m
git show dfb02e6e4f2f7b573337763e5c0013802e392818
git show dfb02
git show HEAD
git show HEAD^
git tag
git tag -a v2.0 -m 'xxx'
git show v2.0
git log v2.0
git diff
git diff --cached
git diff HEAD^
git diff HEAD -- ./lib
git diff origin/master..master
git diff origin/master..master --stat
git remote add origin git+ssh://git@192.168.53.168/VT.git
git branch
git branch --contains 50089
git branch -a
git branch -r
git branch --merged
git branch --no-merged
git branch -m master master_copy
git checkout -b master_copy
git checkout -b master master_copy
git checkout features/performance
git checkout --track hotfixes/BJVEP933
git checkout v2.0
git checkout -b devel origin/develop
git checkout -- README
git merge origin/master
git cherry-pick ff44785404a8e
git push origin master
git push origin :hotfixes/BJVEP933
git push --tags
git fetch
git fetch --prune
git pull origin master
git mv README README2
git reset --hard HEAD
git rebase
git branch -d hotfixes/BJVEP933
git branch -D hotfixes/BJVEP933
git ls-files
git show-branch
git show-branch --all
git whatchanged
git revert dfb02e6e4f2f7b573337763e5c0013802e392818
git ls-tree HEAD
git rev-parse v2.0
git reflog
git show HEAD@{5}
git show master@{yesterday}
git log --pretty=format:'%h %s' --graph
git show HEAD~3
git show -s --pretty=raw 2be7fcb476
git stash
git stash list
git stash show -p stash@{0}
git stash apply stash@{0}
git grep "delete from"
git grep -e '#define' --and -e SORT_DIRENT
git gc
git fsck
|


